Examples
Quick start
The following code demonstrates a simple use case of storing values of double
and std::string types in a single container using multi_type_vector.
#include <mdds/multi_type_vector.hpp>
#include <iostream>
#include <vector>
#include <string>

using std::cout;
using std::endl;

using mtv_type = mdds::multi_type_vector<mdds::mtv::standard_element_blocks_traits>;

template<typename BlockT>
void print_block(const mtv_type::value_type& v)
{
    for (const auto& elem : BlockT::range(*v.data))
    {
        cout << " * " << elem << endl;
    }
}

int main() try
{
    mtv_type con(20); // Initialized with 20 empty elements.

    // Set values individually.
    con.set(0, 1.1);
    con.set(1, 1.2);
    con.set(2, 1.3);

    // Set a sequence of values in one step.
    std::vector<double> vals = { 10.1, 10.2, 10.3, 10.4, 10.5 };
    con.set(3, vals.begin(), vals.end());

    // Set string values.
    con.set<std::string>(10, "Andy");
    con.set<std::string>(11, "Bruce");
    con.set<std::string>(12, "Charlie");

    // Iterate through all blocks and print all elements.
    for (const auto& v : con)
    {
        switch (v.type)
        {
            case mdds::mtv::element_type_double:
            {
                cout << "numeric block of size " << v.size << endl;
                print_block<mdds::mtv::double_element_block>(v);
                break;
            }
            case mdds::mtv::element_type_string:
            {
                cout << "string block of size " << v.size << endl;
                print_block<mdds::mtv::string_element_block>(v);
                break;
            }
            case mdds::mtv::element_type_empty:
                cout << "empty block of size " << v.size << endl;
                cout << " - no data - " << endl;
            default:
                ;
        }
    }

    return EXIT_SUCCESS;
}
catch (...)
{
    return EXIT_FAILURE;
}
You’ll see the following console output when you compile and execute this code:
numeric block of size 8
 * 1.1
 * 1.2
 * 1.3
 * 10.1
 * 10.2
 * 10.3
 * 10.4
 * 10.5
empty block of size 2
 - no data -
string block of size 3
 * Andy
 * Bruce
 * Charlie
empty block of size 7
 - no data -

Logical structure between the primary array, blocks, and element blocks.
Each multi_type_vector instance maintains a logical storage structure of one
primary array containing one or more blocks each of which consists of type,
position, size and data members:
type- numeric value representing the block type.position- numeridc value representing the logical position of the first element of the block.size- number of elements present in the block a.k.a its logical size.data- pointer to the secondary storage (element block) storing the element values.
In this example code, the type member is referenced to determine its block
type and its logical size is determined from the size member. For the
numeric and string blocks, their data members, which should point to the
memory addresses of their respective element blocks, are dereferenced in order
to print out their element values to stdout inside the print_block function.
Standard element block types
It is worth noting that the two block types used in the previous example, namely
double_element_block and string_element_block
didn’t come out of nowhere. By default, including the header that defines multi_type_vector
implicitly also defines the following block types:
which respectively store elements of the following value types:
boolint8_tuint8_tint16_tuint16_tint32_tuint32_tint64_tuint64_tfloatdoublestd::string
The header also defines the mdds::mtv::standard_element_blocks_traits
struct which you can pass to the multi_type_vector template
definition in order to have all of the above mentioned block types and their
respective value types available for use.
Specifying custom types in element blocks
There are times when you need to store a set of user-defined types in multi_type_vector.
That is what we are going to talk about in this section.
First, let’s include the header:
#include <mdds/multi_type_vector.hpp>
then proceed to define some constant values to use as element types. We are going to define three custom value types, so we need three element types defined:
constexpr mdds::mtv::element_t custom_value1_type = mdds::mtv::element_type_user_start;
constexpr mdds::mtv::element_t custom_value2_type = mdds::mtv::element_type_user_start + 1;
constexpr mdds::mtv::element_t custom_value3_type = mdds::mtv::element_type_user_start + 2;
Here, you need to ensure that the values used will not collide with the values
that may be used for the standard value types. The best way to ensure that is
to assign the values that are greater than or equal to element_type_user_start
as the code above does. Values less than element_type_user_start
are reserved for use either for the standard value types or any other internal uses
in the future.
Now, let’s define the first two custom value types, and their respective block types:
struct custom_value1 {};
struct custom_value2 {};

using custom_value1_block = mdds::mtv::default_element_block<custom_value1_type, custom_value1>;
using custom_value2_block = mdds::mtv::default_element_block<custom_value2_type, custom_value2>;
Here, we are using the default_element_block as the basis
to define their block types. At minimum, you need to specify the element type constant
and the value type as its template arguments. There is a third optional template
argument you can specify which will become the underlying storage type. By
default, delayed_delete_vector is used when the third
argument is not given. But you can specify other types such as std::vector
or std::deque instead, or any other types that have similar interfaces
to std::vector.
Once the block types are defined, it’s time to define callback functions for them.
This should be as simple as using the MDDS_MTV_DEFINE_ELEMENT_CALLBACKS with
all necessary parameters provided:
MDDS_MTV_DEFINE_ELEMENT_CALLBACKS(custom_value1, custom_value1_type, custom_value1{}, custom_value1_block)
MDDS_MTV_DEFINE_ELEMENT_CALLBACKS(custom_value2, custom_value2_type, custom_value2{}, custom_value2_block)
Our third type is defined in a namespace ns, and its associated block type is
also defined in the same namespace. One thing to keep in mind is that, when the
custom type is defined in a namespace, its callback functions must also be defined
in the same namespace in order for them to be discovered per argument dependent lookup
during overload resolution. This means that you must place the macro that defines
the callback functions in the same namespace as the namespace that encompasses the
original value type:
namespace ns {

struct custom_value3 {};

using custom_value3_block = mdds::mtv::default_element_block<custom_value3_type, custom_value3>;

// This macro MUST be in the same namespace as that of the value type, in order for
// argument-dependent lookup to work properly during overload resolution.
MDDS_MTV_DEFINE_ELEMENT_CALLBACKS(custom_value3, custom_value2_type, custom_value3{}, custom_value3_block)

} // namespace ns
Warning
If the original value type is defined inside a namespace, its associated callback functions must also be defined in the same namespace, due to the way argument dependent lookup works during overload resolution.
The next step is to define a trait type that specifies these block types. The
easiest way is to have your trait inherit from mdds::mtv::default_traits
and overwrite the block_funcs static member
type with an instance of mdds::mtv::element_block_funcs with one or
more block types specified as its template arguments:
struct my_custom_traits : public mdds::mtv::default_traits
{
    using block_funcs = mdds::mtv::element_block_funcs<
        custom_value1_block, custom_value2_block, ns::custom_value3_block>;
};
Now we are ready to define the final multi_type_vector type
with the trait we just defined:
using mtv_type = mdds::multi_type_vector<my_custom_traits>;
And that’s it! With this in place, you can write a code like the following:
mtv_type con{}; // initialize it as empty container.

// Push three values of different types to the end.
con.push_back(custom_value1{});
con.push_back(custom_value2{});
con.push_back(ns::custom_value3{});

auto v1 = con.get<custom_value1>(0);
auto v2 = con.get<custom_value2>(1);
auto v3 = con.get<ns::custom_value3>(2);

std::cout << "is this custom_value1? " << std::is_same_v<decltype(v1), custom_value1> << std::endl;
std::cout << "is this custom_value2? " << std::is_same_v<decltype(v2), custom_value2> << std::endl;
std::cout << "is this ns::custom_value3? " << std::is_same_v<decltype(v3), ns::custom_value3> << std::endl;
to put some values of the custom types into your container and accessing them. This code should generate the following output:
is this custom_value1? 1
is this custom_value2? 1
is this ns::custom_value3? 1
Specifying different storage type
By default, mdds::mtv::default_element_block uses mdds::mtv::delayed_delete_vector
as its underlying storage type to store its elements starting with version 2.1. Prior to
2.1, std::vector was used as the only storage type of choice. If you use 2.1 or newer
versions of the library, you can specify your own storage type as the third template argument to
mdds::mtv::default_element_block.
Let’s tweak the previous example to specify std::vector and std::deque as the
storage types for custom_value1_block and custom_value2_block, respectively:
using custom_value1_block = mdds::mtv::default_element_block<
    custom_value1_type, custom_value1, std::vector>;

using custom_value2_block = mdds::mtv::default_element_block<
    custom_value2_type, custom_value2, std::deque>;
For custom_value3_block, we will leave it as the default storage type, namely,
mdds::mtv::delayed_delete_vector:
// This implicitly uses mdds::mtv::delayed_delete_vector.
using custom_value3_block = mdds::mtv::default_element_block<
    custom_value3_type, custom_value3>;
You can specify different storage types for different block types as you can see above. But unless you have a good reason to do so, you may want to stick with the same storage type for all of your blocks in order to have consistent performance characteristics.
With this now in place, let’s run the following code:
std::cout << "custom_value1 stored in std::vector? "
    << std::is_same_v<custom_value1_block::store_type, std::vector<custom_value1>>
    << std::endl;

std::cout << "custom_value2 stored in std::deque? "
    << std::is_same_v<custom_value2_block::store_type, std::deque<custom_value2>>
    << std::endl;

std::cout << "ns::custom_value3 stored in delayed_delete_vector? "
    << std::is_same_v<ns::custom_value3_block::store_type, mdds::mtv::delayed_delete_vector<ns::custom_value3>>
    << std::endl;
which should generate the following output:
custom_value1 stored in std::vector? 1
custom_value2 stored in std::deque? 1
ns::custom_value3 stored in delayed_delete_vector? 1
One thing to note is that, in order for a class to be usable as the storage type for
default_element_block, it must be a template class
with two parameters: the first one being the value type while the second one
is the allocator type just like how std::vector or std::deque
are defined.
Different storage types in standard element blocks
Now, what if you need to specify different storage types in the blocks already defined for the standard value types, given that, as explained in the Standard element block types section, those standard element blocks are automagically defined?
The answer is that it is possible to do such a thing, but it will require that you follow a certain set of steps, as outlined below:
First, manually define the element type constants, block types, and their respecitve callback functions for the standard value types you need to use as if they were user-defined types. When doing so, specify the non-default storage types you need to use for these blocks.
Include the header for the multi_type_vector definition with the special macro value named
MDDS_MTV_USE_STANDARD_ELEMENT_BLOCKS defined and its value is set to 0. This bypasses the
automatic inclusion of the block types for the standard value types when this header is included.
Lastly, define a custom trait type and overwrite the block_funcs member type to specify the block types
defined in the first step. This is essentially the same step you would take when you define custom
block types for user-defined value types.
Let’s do this step-by-step. First, include the necessary headers:
#include <mdds/multi_type_vector/types.hpp>
#include <mdds/multi_type_vector/macro.hpp>

#include <deque>
The types.hpp header is required for the element_t and
default_element_block, and the macro.hpp header is required
for the MDDS_MTV_DEFINE_ELEMENT_CALLBACKS macro. The <deque> header is so
that we can use std::deque as storage types in our block types.
Next, let’s define the element and block types as well as their callback functions:
// Define element ID's for the standard element types.
constexpr mdds::mtv::element_t my_doube_type_id = mdds::mtv::element_type_user_start;
constexpr mdds::mtv::element_t my_int32_type_id = mdds::mtv::element_type_user_start + 1;

// Define the block types.
using my_double_block = mdds::mtv::default_element_block<my_doube_type_id, double, std::deque>;
using my_int32_block = mdds::mtv::default_element_block<my_int32_type_id, std::int32_t, std::deque>;

MDDS_MTV_DEFINE_ELEMENT_CALLBACKS(double, my_doube_type_id, 0.0, my_double_block)
MDDS_MTV_DEFINE_ELEMENT_CALLBACKS(std::int32_t, my_int32_type_id, 0, my_int32_block)
This is very similar to how it is done in the Specifying different storage type section. The only difference is that, this part needs to happen before the header for the multi_type_vector type gets included, in order for the multi_type_vector implementation code to reference the callback functions now that the callback functions for the standard value types will no longer be included.
Let’s proceed to include the multi_type_vector header:
#define MDDS_MTV_USE_STANDARD_ELEMENT_BLOCKS 0
#include <mdds/multi_type_vector/soa/main.hpp>
Here, we define the MDDS_MTV_USE_STANDARD_ELEMENT_BLOCKS macro and set its value to
0, to skip the inclusion of the standard element blocks. It is also worth noting that we
are including the mdds/multi_type_vector/soa/main.hpp header directly instead of
mdds/multi_type_vector.hpp, which indirectly includes the first header.
Lastly, let’s define the trait type to specify the block types to use, and instantiate the final multi_type_vector type:
struct my_custom_traits : public mdds::mtv::default_traits
{
    using block_funcs = mdds::mtv::element_block_funcs<my_double_block, my_int32_block>;
};

using mtv_type = mdds::mtv::soa::multi_type_vector<my_custom_traits>;
Now that the concrete multi_type_vector is defined, we can use it to store some values of the specified types:
mtv_type con(20); // Initialized with 20 empty elements.

con.set<std::int32_t>(0, 234);
con.set<double>(1, 425.1);
If you inspect the storage types of the element blocks like the following:
std::cout << "my_double_block: is std::deque its store type? "
    << std::is_same_v<my_double_block::store_type, std::deque<double>>
    << std::endl;
std::cout << "my_int32_block: is std::deque its store type? "
    << std::is_same_v<my_int32_block::store_type, std::deque<std::int32_t>>
    << std::endl;
you should see the following output:
my_double_block: is std::deque its store type? 1
my_int32_block: is std::deque its store type? 1
which indicates that they are indeed std::deque.
Use custom event handlers
It is also possible to define custom event handlers that get called when certain events take place. To define custom event handlers, you need to define either a class or a struct that has the following methods:
void element_block_acquired(mdds::mtv::base_element_block* block)
void element_block_released(mdds::mtv::base_element_block* block)
as its public methods, specify it as type named event_func in a trait struct,
and pass it as the second template argument when instantiating your
multi_type_vector type. Refer to mdds::mtv::empty_event_func
for the detail on when each event handler method gets triggered.
The following code example demonstrates how this all works:
#include <mdds/multi_type_vector.hpp>
#include <iostream>

using std::cout;
using std::endl;

class event_hdl
{
public:
    void element_block_acquired(mdds::mtv::base_element_block* block)
    {
        (void)block;
        cout << "  * element block acquired" << endl;
    }

    void element_block_released(mdds::mtv::base_element_block* block)
    {
        (void)block;
        cout << "  * element block released" << endl;
    }
};

struct trait : mdds::mtv::standard_element_blocks_traits
{
    using event_func = event_hdl;
};

using mtv_type = mdds::multi_type_vector<trait>;

int main() try
{
    mtv_type db;  // starts with an empty container.

    cout << "inserting string 'foo'..." << endl;
    db.push_back(std::string("foo"));  // creates a new string element block.

    cout << "inserting string 'bah'..." << endl;
    db.push_back(std::string("bah"));  // appends to an existing string block.

    cout << "inserting int 100..." << endl;
    db.push_back(int(100)); // creates a new int element block.

    cout << "emptying the container..." << endl;
    db.clear(); // releases both the string and int element blocks.

    cout << "exiting program..." << endl;

    return EXIT_SUCCESS;
}
catch (...)
{
    return EXIT_FAILURE;
}
You’ll see the following console output when you compile and execute this code:
inserting string 'foo'...
  * element block acquired
inserting string 'bah'...
inserting int 100...
  * element block acquired
emptying the container...
  * element block released
  * element block released
exiting program...
In this example, the element_block_acquired handler gets triggered each time the container creates (thus acquires) a new element block to store a value. It does not get called when a new value is appended to a pre-existing element block. Similarly, the element_block_releasd handler gets triggered each time an existing element block storing non-empty values gets deleted. One thing to keep in mind is that since these two handlers respond to events related to element blocks which are owned by non-empty blocks in the primary array, and empty blocks don’t store any element block instances, creations or deletions of empty blocks don’t trigger these event handlers.
The trait also allows you to configure other behaviors of multi_type_vector.
Refer to mdds::mtv::default_traits for all available parameters.
Get raw pointer to element block array
Sometimes you need to expose a pointer to an element block array especially
when you need to pass such an array pointer to C API that requires one. You
can do this by calling the data method of the element_block template
class. This works since the element block internally just wraps
std::vector or one that acts like it, such as
std::deque or delayed_delete_vector, and
its data method simply exposes the internal storage types’s own data
method which returns the memory location of its internal buffer.
The following code demonstrates this by exposing raw array pointers to the internal arrays of numeric and string element blocks, and printing their element values directly from these array pointers.
#include <mdds/multi_type_vector.hpp>
#include <iostream>

using std::cout;
using std::endl;
using mdds::mtv::double_element_block;
using mdds::mtv::string_element_block;

using mtv_type = mdds::multi_type_vector<mdds::mtv::standard_element_blocks_traits>;

int main() try
{
    mtv_type db;  // starts with an empty container.

    db.push_back(1.1);
    db.push_back(1.2);
    db.push_back(1.3);
    db.push_back(1.4);
    db.push_back(1.5);

    db.push_back(std::string("A"));
    db.push_back(std::string("B"));
    db.push_back(std::string("C"));
    db.push_back(std::string("D"));
    db.push_back(std::string("E"));

    // At this point, you have 2 blocks in the container.
    cout << "block size: " << db.block_size() << endl;
    cout << "--" << endl;

    // Get an iterator that points to the first block in the primary array.
    mtv_type::const_iterator it = db.begin();

    // Get a pointer to the raw array of the numeric element block using the
    // 'data' method.
    const double* p = double_element_block::data(*it->data);

    // Print the elements from this raw array pointer.
    for (const double* p_end = p + it->size; p != p_end; ++p)
        cout << *p << endl;

    cout << "--" << endl;

    ++it; // move to the next block, which is a string block.

    // Get a pointer to the raw array of the string element block.
    const std::string* pz = string_element_block::data(*it->data);

    // Print out the string elements.
    for (const std::string* pz_end = pz + it->size; pz != pz_end; ++pz)
        cout << *pz << endl;

    return EXIT_SUCCESS;
}
catch (...)
{
    return EXIT_FAILURE;
}
Compiling and execute this code produces the following output:
block size: 2
--
1.1
1.2
1.3
1.4
1.5
--
A
B
C
D
E
Traverse multiple multi_type_vector instances “sideways”
In this section we will demonstrate a way to traverse multiple instances of
multi_type_vector “sideways” using the
mdds::mtv::collection class. What this class does is to wrap
multiple instances of multi_type_vector and generate
iterators that let you iterate the individual element values collectively in
the direction orthogonal to the direction of the individual vector instances.
The best way to explain this feature is to use a spreadsheet analogy. Let’s say we are implementing a data store to store a 2-dimensional tabular data where each cell in the data set is associated with row and column indices. Each cell may store a value of string type, integer type, numeric type, etc. And let’s say that the data looks like the following spreadsheet data:
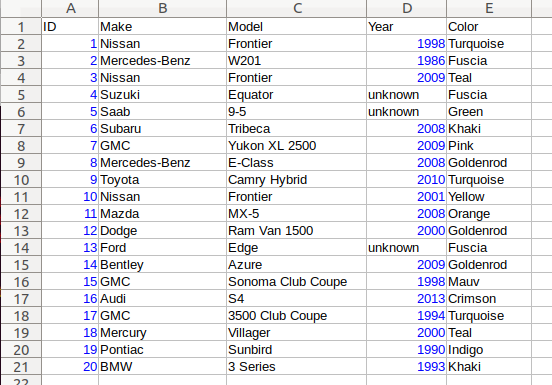
It consists of five columns, with each column storing 21 rows of data. The
first row is a header row, followed by 20 rows of values. In this example, We
will be using one multi_type_vector instance for each
column thus creating five instances in total, and store them in a
std::vector container.
The declaration of the data store will look like this:
using mtv_type = mdds::multi_type_vector<mdds::mtv::standard_element_blocks_traits>;
using collection_type = mdds::mtv::collection<mtv_type>;

std::vector<mtv_type> columns(5);
The first two lines specify the concrete multi_type_vector
type used for each individual column and the collection type that wraps the
columns. The third line instantiates the std::vector instance to store
the columns, and we are setting its size to five to accommodate for five
columns. We will make use of the collection_type later in this example after
the columns have been populated.
Now, we need to populate the columns with values. First, we are setting the header row:
// Populate the header row.
const char* headers[] = { "ID", "Make", "Model", "Year", "Color" };
size_t i = 0;
for (const char* v : headers)
    columns[i++].push_back<std::string>(v);
We are then filling each column individually from column 1 through column 5. First up is column 1:
// Fill column 1.
int c1_values[] = { 1, 2, 3, 4, 5, 6, 7, 8, 9, 10, 11, 12, 13, 14, 15, 16, 17, 18, 19, 20 };

for (int v : c1_values)
    columns[0].push_back(v);
Hopefully this code is straight-forward. It initializes an array of values
and push them to the column one at a time via
push_back(). Next up is column 2:
// Fill column 2.
const char* c2_values[] =
{
    "Nissan", "Mercedes-Benz", "Nissan", "Suzuki", "Saab", "Subaru", "GMC", "Mercedes-Benz", "Toyota", "Nissan",
    "Mazda", "Dodge", "Ford", "Bentley", "GMC", "Audi", "GMC", "Mercury", "Pontiac", "BMW",
};

for (const char* v : c2_values)
    columns[1].push_back<std::string>(v);
This is similar to the code for column 1, except that because we are using an
array of string literals which implicitly becomes an initializer list of type
const char*, we need to explicitly specify the type for the
push_back() call to be std::string.
The code for column 3 is very similar to this:
// Fill column 3.
const char* c3_values[] =
{
    "Frontier", "W201", "Frontier", "Equator", "9-5", "Tribeca", "Yukon XL 2500", "E-Class", "Camry Hybrid", "Frontier",
    "MX-5", "Ram Van 1500", "Edge", "Azure", "Sonoma Club Coupe", "S4", "3500 Club Coupe", "Villager", "Sunbird", "3 Series",
};

for (const char* v : c3_values)
    columns[2].push_back<std::string>(v);
Populating column 4 needs slight pre-processing. We are inserting a string value of “unknown” in lieu of an integer value of -1. Therefore the following code will do:
// Fill column 4.  Replace -1 with "unknown".
int32_t c4_values[] =
{
    1998, 1986, 2009, -1, -1, 2008, 2009, 2008, 2010, 2001,
    2008, 2000, -1, 2009, 1998, 2013, 1994, 2000, 1990, 1993,
};

for (int32_t v : c4_values)
{
    if (v < 0)
        // Insert a string value "unknown".
        columns[3].push_back<std::string>("unknown");
    else
        columns[3].push_back(v);
}
Finally, the last column to fill, which uses the same logic as for columns 2 and 3:
// Fill column 5
const char* c5_values[] =
{
    "Turquoise", "Fuscia", "Teal", "Fuscia", "Green", "Khaki", "Pink", "Goldenrod", "Turquoise", "Yellow",
    "Orange", "Goldenrod", "Fuscia", "Goldenrod", "Mauv", "Crimson", "Turquoise", "Teal", "Indigo", "LKhaki",
};

for (const char* v : c5_values)
    columns[4].push_back<std::string>(v);
At this point, the content we’ve put into the columns variable roughly
reflects the tabular data shown at the beginning of this section. Now we can
use the collection type we’ve declared earlier to wrap the columns:
// Wrap the columns with the 'collection'...
collection_type rows(columns.begin(), columns.end());
We are naming this variable rows since what we are doing with this wrapper
is to traverse the content of the tabular data in row-wise direction. For
this reason, calling it rows is quite fitting.
The collection class offers some flexibility as to
how the instances that you are trying to traverse orthogonally are stored.
That being said, you must meet the following prerequisites when passing the
collection of vector instances to the constructor of the
collection class:
All
multi_type_vectorinstances that comprise the collection must be of the same logical length i.e. theirsize()methods must all return the same value.The instances in the collection must be stored in the source container either as
concrete instances (as in this example),
as pointers, or
as heap instances wrapped within smart pointer class such as
std::shared_ptrorstd::unique_ptr.
Although we are storing the vector instances in a std::vector container in
this example, you have the flexibility to pick a different type of container
to store the individual vector instances as long as it provides STL-compatible
standard iterator functionality.
Additionally, when using the collection class, you
must ensure that the content of the vector instances that it references will
not change for the duration of its use.
Finally, here is the code that does the traversing:
// Traverse the tabular data in row-wise direction.
for (const auto& cell : rows)
{
    if (cell.index > 0)
        // Insert a column separator before each cell except for the ones in the first column.
        std::cout << " | ";

    switch (cell.type)
    {
        // In this example, we use two element types only.
        case mdds::mtv::element_type_int32:
            std::cout << cell.get<mdds::mtv::int32_element_block>();
            break;
        case mdds::mtv::element_type_string:
            std::cout << cell.get<mdds::mtv::string_element_block>();
            break;
        default:
            std::cout << "???"; // The default case should not hit in this example.
    }

    if (cell.index == 4)
        // We are in the last column. Insert a line break.
        std::cout << std::endl;
}
It’s a simple for-loop, and in each iteration you get a single cell node that contains metadata about that cell including its value. The node contains the following members:
type- an integer value representing the type of the value.index- a 0-based index of themulti_type_vectorinstance within the collection. You can think of this as column index in this example.position- a 0-based logical element position within eachmulti_type_vectorinstance. You can think of this as row index in this example.
In the current example we are only making use of the type and index
members, but the position member will be there if you need it.
The node also provides a convenient get() method to fetch the value of the
cell. This method is a template method, and you need to explicitly specify
the element block type in order to access the value.
When executing this code, you will see the following outout:
ID | Make | Model | Year | Color
1 | Nissan | Frontier | 1998 | Turquoise
2 | Mercedes-Benz | W201 | 1986 | Fuscia
3 | Nissan | Frontier | 2009 | Teal
4 | Suzuki | Equator | unknown | Fuscia
5 | Saab | 9-5 | unknown | Green
6 | Subaru | Tribeca | 2008 | Khaki
7 | GMC | Yukon XL 2500 | 2009 | Pink
8 | Mercedes-Benz | E-Class | 2008 | Goldenrod
9 | Toyota | Camry Hybrid | 2010 | Turquoise
10 | Nissan | Frontier | 2001 | Yellow
11 | Mazda | MX-5 | 2008 | Orange
12 | Dodge | Ram Van 1500 | 2000 | Goldenrod
13 | Ford | Edge | unknown | Fuscia
14 | Bentley | Azure | 2009 | Goldenrod
15 | GMC | Sonoma Club Coupe | 1998 | Mauv
16 | Audi | S4 | 2013 | Crimson
17 | GMC | 3500 Club Coupe | 1994 | Turquoise
18 | Mercury | Villager | 2000 | Teal
19 | Pontiac | Sunbird | 1990 | Indigo
20 | BMW | 3 Series | 1993 | LKhaki
which clearly shows that the code has traversed the content of the tabular data horizontally across columns as intended.
Now, one feature that may come in handy is the ability to limit the iteration
range within the collection. You can do that by calling either
set_collection_range() to limit the column
range or set_element_range() to limit the
row range, or perhaps both.
Let’s see how this works in the current example. Here, we are going to limit the iteration range to only columns 2 and 3, and rows 2 through 11. The following code will set this limit:
rows.set_collection_range(1, 2); // only columns 2 and 3.
rows.set_element_range(1, 10);   // only rows 2 through 11.
Then iterate through the collection once again:
for (const auto& cell : rows)
{
    if (cell.index > 1)
        // Insert a column separator before each cell except for the ones in the first column.
        std::cout << " | ";

    switch (cell.type)
    {
        // In this example, we use two element types only.
        case mdds::mtv::element_type_int32:
            std::cout << cell.get<mdds::mtv::int32_element_block>();
            break;
        case mdds::mtv::element_type_string:
            std::cout << cell.get<mdds::mtv::string_element_block>();
            break;
        default:
            std::cout << "???"; // The default case should not hit in this example.
    }

    if (cell.index == 2)
        // We are in the last column. Insert a line break.
        std::cout << std::endl;
}
This code is nearly identical to the previous one except for the index values used to control when to insert column separators and line breaks at the top and bottom of each iteration. When executing this code, you’ll see the following output:
Nissan | Frontier
Mercedes-Benz | W201
Nissan | Frontier
Suzuki | Equator
Saab | 9-5
Subaru | Tribeca
GMC | Yukon XL 2500
Mercedes-Benz | E-Class
Toyota | Camry Hybrid
Nissan | Frontier
which clearly shows that your iteration range did indeed shrink as expected.
Performance Considerations
Select SoA or AoS storage types
If you instantiate a multi_type_vector instance via
mdds::multi_type_vector, which is an alias type for
mdds::mtv::soa::multi_type_vector, you will be using the
structure-of-arrays (SoA) variant of its implementation which is new in 2.0.
Prior to 2.0, multi_type_vector used the array-of-structures (AoS) layout which
is still available post 2.0 via mdds::mtv::aos::multi_type_vector
in case you need it.
Note, however, that the SoA variant generally yields better overall performance since it can make more efficient use of CPU caches. It is therefore highly recommended that you stick with the SoA variant unless you have a specific reason not to.
Also note that both variants are API compatibile with each other.
Use of position hints to avoid the cost of block position lookup
Consider the following example code:
using mtv_type = mdds::multi_type_vector<mdds::mtv::standard_element_blocks_traits>;

size_t size = 50000;

// Initialize the container with one empty block of size 50000.
mtv_type db(size);

// Set non-empty value at every other logical position from top down.
for (size_t i = 0; i < size; ++i)
{
    if (i % 2)
        db.set<double>(i, 1.0);
}
which, when executed, may take quite sometime to complete especially when you are using an older version of mdds. This particular example exposes one weakness that multi_type_vector has; because it needs to first look up the position of the block to operate with, and that lookup always starts from the first block, the time it takes to find the correct block increases as the number of blocks goes up. This example demonstrates the worst case scenario of such lookup complexity since it always inserts the next value at the last block position.
Fortunately, there is a simple solution to this which the following code demonstrates:
using mtv_type = mdds::multi_type_vector<mdds::mtv::standard_element_blocks_traits>;

size_t size = 50000;

// Initialize the container with one empty block of size 50000.
mtv_type db(size);
mtv_type::iterator pos = db.begin();

// Set non-empty value at every other logical position from top down.
for (size_t i = 0; i < size; ++i)
{
    if (i % 2)
        // Pass the position hint as the first argument, and receive a new
        // one returned from the method for the next call.
        pos = db.set<double>(pos, i, 1.0);
}
Compiling and executing this code should take only a fraction of a second.
The only difference between the second example and the first one is that the
second one uses an interator as a position hint to keep track of the position of
the last modified block. Each
set() method call returns an
iterator which can then be passed to the next
set() call as the position hint.
Because an iterator object internally stores the location of the block the value
was inserted to, this lets the method to start the block position lookup process
from the last modified block, which in this example is always one block behind
the one the new value needs to go. Using the big-O notation, the use of the
position hint essentially turns the complexity of O(n^2) in the first example
into O(1) in the second one if you are using an older version of mdds where the
block position lookup had a linear complexity.
This strategy should work with any methods in multi_type_vector
that take a position hint as the first argument.
Note that, if you are using a more recent version of mdds (1.6.0 or newer), the cost of block position lookup is significantly lessoned thanks to the switch to binary search in performing the lookup.
Note
If you are using mdds 1.6.0 or newer, the cost of block position lookup is much less significant even without the use of position hints. But the benefit of using position hints may still be there. It’s always a good idea to profile your specific use case and decide whether the use of position hints is worth it.
One important thing to note is that, as a user, you must ensure that the position hint you pass stays valid between the calls. A position hint becomes invalid when the content of the container changes. A good strategy to maintain a valid position hint is to always receive the iterator returned from the mutator method you called to which you passed the previous position hint, which is what the code above does. Passing an invalid position hint to a method that takes one may result in invalid memory access or otherwise in some sort of undefined behavior.
Warning
You must ensure that the position hint you pass stays valid. Passing an invalid position hint to a method that takes one may result in invalid memory access or otherwise in some sort of undefined behavior.
Block shifting performance and loop-unrolling factor
The introduction of binary search in the block position lookup implementation in version 1.6 has significantly improved its lookup performance, but has also resulted in slight performance hit when shifting blocks during value insertion. This is because when shifting the logical positions of the blocks below the insertion point, their head positions need to be re-calculated to account for their new positions.
The good news is that the switch to the structure-of-arrays (SoA) storage layout in 2.0 alone may bring subtle but measurable improvement in the block position adjustment performance due to the logical block positions now being stored in a separate array thereby improving its cache efficiency. In reality, however, this was somewhat dependent on the CPU types since some CPU’s didn’t show any noticeable improvements or even showed worse performance, while other CPU types showed consistent improvements with SoA over AoS.
Another factor that may play a role is loop unrolling
factor which can be configured via the loop_unrolling
variable in your custom trait type if you use version 2.0 or newer. This variable
is an enum class of type mdds::mtv::lu_factor_t which enumerates
several pre-defined loop-unrolling factors as well as some SIMD features.
The hardest part is to figure out which loop unrolling factor is the best option in your runtime environment, since it is highly dependent on the environment. Luckily mdds comes with a tool called runtime-env which, when run, will perform some benchmarks and give you the best loop-unrolling factor in your runtime environment. Be sure to build this tool with the same compiler and compiler flags as your target program in order for this tool to give you a representative answer.
Debugging
Tracing of public methods
When using multi_type_vector to handle a series
of data reads and writes in an non-trivial code base, sometimes you may find
yourself needing to track which methods are getting called when following a
certain code path during a debugging session. In such a situation, you can enable
an optional trace method which gets called whenever a public method of multi_type_vector
is called.
First, you need to define a preprocessor macro named
MDDS_MULTI_TYPE_VECTOR_DEBUG before including the header for
multi_type_vector:
#define MDDS_MULTI_TYPE_VECTOR_DEBUG 1
#include <mdds/multi_type_vector/soa/main.hpp>

#include <iostream>
to enable additional debug code. In this example the value of the macro is set to 1, but it doesn’t matter what the value of the macro is, as long as it is defined. You can also define one as a compiler option as well.
Once defined, the next step is to add a trace method as a static function to
the trait type you pass as a template argument of multi_type_vector:
namespace mtv = mdds::mtv;

struct mtv_traits : public mtv::standard_element_blocks_traits
{
    static void trace(const mtv::trace_method_properties_t& props)
    {
        std::cout << "function:" << std::endl
                  << "  name: " << props.function_name << std::endl
                  << "  args: " << props.function_args << std::endl;
    }
};

using mtv_type = mtv::soa::multi_type_vector<mtv_traits>;
Here, we are simply inheriting our trait type from the
default_traits type and simply adding a static trace
function to it, and passing this trait type to the mtv_type definition below.
This trace function must take one argument of type
mdds::mtv::trace_method_properties_t which includes various
properties of the traced call. In this example, we are simply printing the
properties named
function_name and
function_args each time a
traced method is called. Both of these properties are printable string types.
Note that this trace function is entirely optional; the code will compile
fine even when it’s not defined. Also, it must be declared as static for it to
be called.
Let’s instantiate an object of mtv_type, call some of its methods and see
what happens. When executing the following code:
mtv_type db(10);
db.set<int32_t>(0, 12);
db.set<int8_t>(2, 34);
db.set<int16_t>(4, 56);
You will see the following output:
function:
  name: multi_type_vector
  args: init_size=10
function:
  name: set
  args: pos=0; value=? (type=5)
function:
  name: set
  args: pos=2; value=? (type=1)
function:
  name: set
  args: pos=4; value=? (type=3)
function:
  name: ~multi_type_vector
  args:
The function_name
property is hopefully self-explanatory. The
function_args property is
a single string value containing the information about the function’s
arguments and optionally their values if their values are known to be
printable. If the value of an argument cannot be printed, ? is placed
instead. For some argument types, an additional information is displayed e.g.
(type=5) in the above output which indicates that the type of the value
being passed to the function is element_type_int32.
If you want to limit your tracing to a specific function type or types, you
can make use of the type
property which specifies the type of the traced method. Likewise, if you want
to only trace methods of a certain instance, use
instance to filter the
incoming trace calls based on the memory addresses of the instances whose
methods are being traced.
Note that this feature is available for version 2.0.2 and newer, and currently
only available for the SoA variant of multi_type_vector.
Note
This feature is only available for version 2.0.2 and newer, and only for the SoA variant.