Traverse multiple multi_type_vector instances “sideways”
In this section we will demonstrate a way to traverse multiple instances of
multi_type_vector “sideways” using the
mdds::mtv::collection class. What this class does is to wrap
multiple instances of multi_type_vector and generate
iterators that let you iterate the individual element values collectively in
the direction orthogonal to the direction of the individual vector instances.
The best way to explain this feature is to use a spreadsheet analogy. Let’s say we are implementing a data store to store a 2-dimensional tabular data where each cell in the data set is associated with row and column indices. Each cell may store a value of string type, integer type, numeric type, etc. And let’s say that the data looks like the following spreadsheet data:
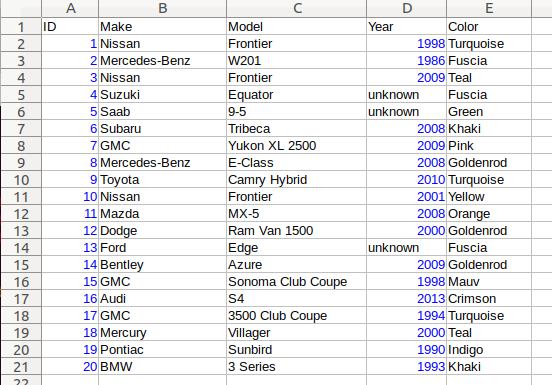
It consists of five columns, with each column storing 21 rows of data. The
first row is a header row, followed by 20 rows of values. In this example, We
will be using one multi_type_vector instance for each
column thus creating five instances in total, and store them in a
std::vector container.
The declaration of the data store will look like this:
using mtv_type = mdds::multi_type_vector<mdds::mtv::standard_element_blocks_traits>;
using collection_type = mdds::mtv::collection<mtv_type>;

std::vector<mtv_type> columns(5);
The first two lines specify the concrete multi_type_vector
type used for each individual column and the collection type that wraps the
columns. The third line instantiates the std::vector instance to store
the columns, and we are setting its size to five to accommodate for five
columns. We will make use of the collection_type later in this example after
the columns have been populated.
Now, we need to populate the columns with values. First, we are setting the header row:
// Populate the header row.
const char* headers[] = { "ID", "Make", "Model", "Year", "Color" };
size_t i = 0;
for (const char* v : headers)
    columns[i++].push_back<std::string>(v);
We are then filling each column individually from column 1 through column 5. First up is column 1:
// Fill column 1.
int c1_values[] = { 1, 2, 3, 4, 5, 6, 7, 8, 9, 10, 11, 12, 13, 14, 15, 16, 17, 18, 19, 20 };

for (int v : c1_values)
    columns[0].push_back(v);
Hopefully this code is straight-forward. It initializes an array of values
and push them to the column one at a time via
push_back(). Next up is column 2:
// Fill column 2.
const char* c2_values[] =
{
    "Nissan", "Mercedes-Benz", "Nissan", "Suzuki", "Saab", "Subaru", "GMC", "Mercedes-Benz", "Toyota", "Nissan",
    "Mazda", "Dodge", "Ford", "Bentley", "GMC", "Audi", "GMC", "Mercury", "Pontiac", "BMW",
};

for (const char* v : c2_values)
    columns[1].push_back<std::string>(v);
This is similar to the code for column 1, except that because we are using an
array of string literals which implicitly becomes an initializer list of type
const char*, we need to explicitly specify the type for the
push_back() call to be std::string.
The code for column 3 is very similar to this:
// Fill column 3.
const char* c3_values[] =
{
    "Frontier", "W201", "Frontier", "Equator", "9-5", "Tribeca", "Yukon XL 2500", "E-Class", "Camry Hybrid", "Frontier",
    "MX-5", "Ram Van 1500", "Edge", "Azure", "Sonoma Club Coupe", "S4", "3500 Club Coupe", "Villager", "Sunbird", "3 Series",
};

for (const char* v : c3_values)
    columns[2].push_back<std::string>(v);
Populating column 4 needs slight pre-processing. We are inserting a string value of “unknown” in lieu of an integer value of -1. Therefore the following code will do:
// Fill column 4.  Replace -1 with "unknown".
int32_t c4_values[] =
{
    1998, 1986, 2009, -1, -1, 2008, 2009, 2008, 2010, 2001,
    2008, 2000, -1, 2009, 1998, 2013, 1994, 2000, 1990, 1993,
};

for (int32_t v : c4_values)
{
    if (v < 0)
        // Insert a string value "unknown".
        columns[3].push_back<std::string>("unknown");
    else
        columns[3].push_back(v);
}
Finally, the last column to fill, which uses the same logic as for columns 2 and 3:
// Fill column 5
const char* c5_values[] =
{
    "Turquoise", "Fuscia", "Teal", "Fuscia", "Green", "Khaki", "Pink", "Goldenrod", "Turquoise", "Yellow",
    "Orange", "Goldenrod", "Fuscia", "Goldenrod", "Mauv", "Crimson", "Turquoise", "Teal", "Indigo", "LKhaki",
};

for (const char* v : c5_values)
    columns[4].push_back<std::string>(v);
At this point, the content we’ve put into the columns variable roughly
reflects the tabular data shown at the beginning of this section. Now we can
use the collection type we’ve declared earlier to wrap the columns:
// Wrap the columns with the 'collection'...
collection_type rows(columns.begin(), columns.end());
We are naming this variable rows since what we are doing with this wrapper
is to traverse the content of the tabular data in row-wise direction. For
this reason, calling it rows is quite fitting.
The collection class offers some flexibility as to
how the instances that you are trying to traverse orthogonally are stored.
That being said, you must meet the following prerequisites when passing the
collection of vector instances to the constructor of the
collection class:
All
multi_type_vectorinstances that comprise the collection must be of the same logical length i.e. theirsize()methods must all return the same value.The instances in the collection must be stored in the source container either as
concrete instances (as in this example),
as pointers, or
as heap instances wrapped within smart pointer class such as
std::shared_ptrorstd::unique_ptr.
Although we are storing the vector instances in a std::vector container in
this example, you have the flexibility to pick a different type of container
to store the individual vector instances as long as it provides STL-compatible
standard iterator functionality.
Additionally, when using the collection class, you
must ensure that the content of the vector instances that it references will
not change for the duration of its use.
Finally, here is the code that does the traversing:
// Traverse the tabular data in row-wise direction.
for (const auto& cell : rows)
{
    if (cell.index > 0)
        // Insert a column separator before each cell except for the ones in the first column.
        std::cout << " | ";

    switch (cell.type)
    {
        // In this example, we use two element types only.
        case mdds::mtv::element_type_int32:
            std::cout << cell.get<mdds::mtv::int32_element_block>();
            break;
        case mdds::mtv::element_type_string:
            std::cout << cell.get<mdds::mtv::string_element_block>();
            break;
        default:
            std::cout << "???"; // The default case should not hit in this example.
    }

    if (cell.index == 4)
        // We are in the last column. Insert a line break.
        std::cout << std::endl;
}
It’s a simple for-loop, and in each iteration you get a single cell node that contains metadata about that cell including its value. The node contains the following members:
type- an integer value representing the type of the value.index- a 0-based index of themulti_type_vectorinstance within the collection. You can think of this as column index in this example.position- a 0-based logical element position within eachmulti_type_vectorinstance. You can think of this as row index in this example.
In the current example we are only making use of the type and index
members, but the position member will be there if you need it.
The node also provides a convenient get() method to fetch the value of the
cell. This method is a template method, and you need to explicitly specify
the element block type in order to access the value.
When executing this code, you will see the following outout:
ID | Make | Model | Year | Color
1 | Nissan | Frontier | 1998 | Turquoise
2 | Mercedes-Benz | W201 | 1986 | Fuscia
3 | Nissan | Frontier | 2009 | Teal
4 | Suzuki | Equator | unknown | Fuscia
5 | Saab | 9-5 | unknown | Green
6 | Subaru | Tribeca | 2008 | Khaki
7 | GMC | Yukon XL 2500 | 2009 | Pink
8 | Mercedes-Benz | E-Class | 2008 | Goldenrod
9 | Toyota | Camry Hybrid | 2010 | Turquoise
10 | Nissan | Frontier | 2001 | Yellow
11 | Mazda | MX-5 | 2008 | Orange
12 | Dodge | Ram Van 1500 | 2000 | Goldenrod
13 | Ford | Edge | unknown | Fuscia
14 | Bentley | Azure | 2009 | Goldenrod
15 | GMC | Sonoma Club Coupe | 1998 | Mauv
16 | Audi | S4 | 2013 | Crimson
17 | GMC | 3500 Club Coupe | 1994 | Turquoise
18 | Mercury | Villager | 2000 | Teal
19 | Pontiac | Sunbird | 1990 | Indigo
20 | BMW | 3 Series | 1993 | LKhaki
which clearly shows that the code has traversed the content of the tabular data horizontally across columns as intended.
Now, one feature that may come in handy is the ability to limit the iteration
range within the collection. You can do that by calling either
set_collection_range() to limit the column
range or set_element_range() to limit the
row range, or perhaps both.
Let’s see how this works in the current example. Here, we are going to limit the iteration range to only columns 2 and 3, and rows 2 through 11. The following code will set this limit:
rows.set_collection_range(1, 2); // only columns 2 and 3.
rows.set_element_range(1, 10);   // only rows 2 through 11.
Then iterate through the collection once again:
for (const auto& cell : rows)
{
    if (cell.index > 1)
        // Insert a column separator before each cell except for the ones in the first column.
        std::cout << " | ";

    switch (cell.type)
    {
        // In this example, we use two element types only.
        case mdds::mtv::element_type_int32:
            std::cout << cell.get<mdds::mtv::int32_element_block>();
            break;
        case mdds::mtv::element_type_string:
            std::cout << cell.get<mdds::mtv::string_element_block>();
            break;
        default:
            std::cout << "???"; // The default case should not hit in this example.
    }

    if (cell.index == 2)
        // We are in the last column. Insert a line break.
        std::cout << std::endl;
}
This code is nearly identical to the previous one except for the index values used to control when to insert column separators and line breaks at the top and bottom of each iteration. When executing this code, you’ll see the following output:
Nissan | Frontier
Mercedes-Benz | W201
Nissan | Frontier
Suzuki | Equator
Saab | 9-5
Subaru | Tribeca
GMC | Yukon XL 2500
Mercedes-Benz | E-Class
Toyota | Camry Hybrid
Nissan | Frontier
which clearly shows that your iteration range did indeed shrink as expected.